Cloud of Darkness stands as one of Final Fantasy XIV’s most memorable encounters, and for good reason. This boss fight demands precision, coordination, and a solid understanding of mechanics that’ll test even veteran raiders. Whether you’re pushing through for the first time or optimizing your clear, you’ll need to know exactly what this fight throws at you, and how to counter it effectively. This guide covers everything from phase mechanics to role-specific strategies, so you can walk into that arena with confidence and walk out with loot in hand.
Table of Contents
ToggleKey Takeaways
- Cloud of Darkness is a three-phase raid encounter requiring precise coordination, cooldown management, and understanding of phase-specific mechanics to clear successfully.
- Tank positioning, healer cooldown stacking, and DPS burst windows during vulnerable phases are critical to surviving Utter Darkness and beating the enrage timer.
- Common progression mistakes like ignoring adds, overextending during spreads, and overlapping healer cooldowns can be prevented through pre-planning and communication protocols.
- Each role must prioritize specific responsibilities: tanks anchor positioning, healers manage mana and cooldown sequencing, and DPS maintain uptime while respecting mechanics.
- Successful teams prepare methodically before raid night by learning phase structures, establishing loot rules, and drilling role-specific strategies rather than winging the encounter.
What Is Cloud of Darkness and Where to Find It
Cloud of Darkness is a significant raid encounter found within Final Fantasy XIV’s endgame content, appearing as a major storyline boss tied to the game’s narrative progression. This encounter carries substantial mechanical complexity and requires coordinated team effort, making it a benchmark for raiders of intermediate to advanced skill levels.
The boss is encountered in specific raid instances that unlock after completing prerequisite story quests. Players must progress through the appropriate dungeon or raid tier to access this encounter. Most groups farm this fight for weekly rewards, tomes, and materials, making it part of the standard raid rotation for progression and gearing.
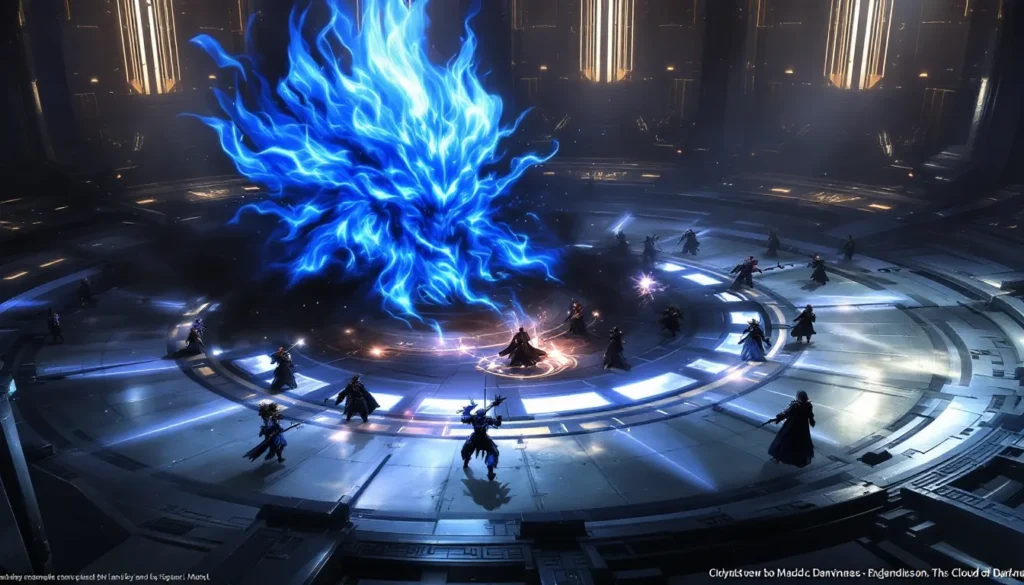
The arena itself features a circular battlefield with distinct positioning markers. Understanding the layout matters, safe zones shift throughout the fight, and positioning mistakes during mechanics can cascade into wipes. The arena doesn’t have any immediately obvious environmental hazards, but mechanics will generate floor patterns you need to respect.
Cloud of Darkness scales in difficulty based on raid tier. Savage versions hit significantly harder than normal mode, with tighter DPS checks and mechanics that leave almost no room for error. Even casual raiders tackling the normal version need to respect the mechanics: they won’t be forgiving if your group slacks off.
Boss Mechanics and Attack Patterns Explained
Cloud of Darkness follows a three-phase structure, with each phase introducing additional mechanics while maintaining baseline attacks from previous phases. Understanding the timeline helps predict what’s coming next and prepares your team for coordinated responses.
Phase One: Opening Offensive
The fight opens with the boss using auto-attacks and basic AOE patterns to establish aggro and test your tank’s positioning. During this phase, watch for Aero III and Tornado, the primary AOE attacks that require movement but aren’t immediately punishing if you catch them. The tank maintains position while DPS burns damage, and healers establish their rotation rhythm.
Meteor Strike appears early and hits hard, this is a tankbuster you need to cooldown properly or risk losing your tank. It telegraphs clearly, giving your tank time to pop defensive CDs. If your tank lacks proper cooldown management here, phase one becomes a DPS race you can’t win.
This phase establishes the tempo. The boss isn’t actively complex yet, but it’s setting expectations for positioning and cooldown management. Expect to see roughly 30-45 seconds of consistent damage phases before the first major mechanic transition.
Phase Two: Enhanced Abilities and AOE Attacks
Phase two escalates intensity significantly. The boss introduces Void Implosion, a mechanic requiring stack assignments or spread positioning depending on your raid comp. Healers need to pre-position for efficient healing coverage. Getting this wrong means unnecessary raid damage and stress on your healing team.
Dark Sphere spawns adds that need immediate attention. These adds heal the boss if left unchecked, making add management a DPS priority. Your group needs a designated add killer (usually one ranged DPS and your tank cycling to them). Ignoring adds bleeds your DPS check and extends the phase unnecessarily.
The AOE patterns become more intricate, expect combinations of cone attacks and circular explosions. Stack markers appear alongside spread mechanics, requiring rapid adjustments. Communication through callouts matters here: your team needs to identify mechanics quickly and move decisively.
During phase two, the boss alternates between tankbuster attacks and raid-wide damage. This is where your healers earn their pay. The damage ramps noticeably, and any lag in cooldown management becomes apparent. Expect this phase to last 60-90 seconds depending on DPS.
Phase Three: Ultimate Mechanics and Enrage Timer
Phase three combines all previous mechanics while introducing the ultimate attack: Utter Darkness. This mechanic hits the entire raid for massive damage and requires coordinated defensive cooldowns. Your party needs to chain defensive CDs (shields, barriers, damage mitigation) to survive. If you’re not prepared, this attack ends the fight immediately.
The enrage timer becomes critical here. Most groups have roughly 2-3 minutes before the boss enrages and one-shots everyone. DPS checks tighten significantly: any wasted GCD or rotational mistake contributes to a failed clear. Burst windows matter, when the boss becomes vulnerable, every DPS needs to maximize output.
Void Implosion returns with increased frequency. You’ll see it multiple times back-to-back. Positioning mistakes here are often fatal because the mechanic hits hard and leaves little recovery time.
The final push requires clean mechanics and peak DPS. Most groups burn the remaining 20% HP in the last 40 seconds before enrage. Survival relies on avoiding mechanics, using cooldowns properly, and maintaining consistent damage uptime. If your team reaches this phase with high HP and full resources, victory is within reach.
Essential Preparation Before the Fight
Recommended Gear, Stats, and Materia Setup
Gear sync matters less once you’re properly geared for the content tier, but materia selection absolutely does. You’re working with specific stat priorities depending on your role.
Tanks need:
- Tenacity materia for mitigation (direct reduction to damage taken)
- Vitality for raw HP pool
- Secondary stat allocation toward Strength for threat generation
Healers prioritize:
- Piety for mana pool and regen (critical for this fight’s healing demands)
- Mind for healing potency
- Avoid overmelding Speed, positioning matters more than casting speed here
DPS split between:
- Crit/Direct Hit builds (depending on job)
- Determination for raw damage
- Don’t sacrifice survivability stats entirely: you still need reasonable defense
Your gear should be current-tier, ideally from the same raid tier you’re progressing through. Synced gear or inadequate stats make mechanics significantly harder because your cooldowns won’t hit as hard and damage-per-second requirements become tighter.
Job Selection and Role Strategy
Job selection matters more than people realize. Cloud of Darkness doesn’t have specific job restrictions, but some jobs handle mechanics more elegantly than others.
Tank selection: Paladin offers strong mitigation with short cooldown availability. Dark Knight provides lower cooldown density but exceptional single-tank hold power. Warrior brings heavy offense-stacked tanking. Gunbreaker balances both. Choose based on your healing team’s ability to support you. Final Fantasy 14 Dark offers detailed strategies specific to that role.
Healer pairing: Scholar/White Mage offers balanced healing with good cooldown stacking. Astrologian brings card utility for bonus damage. Sage provides strong preventative healing. The most important factor: your healers understand each other’s cooldown timings and can cover heavy damage phases together.
DPS composition: You need at least one ranged DPS for add management during phase two. Melee DPS can tunnel the boss but lose uptime when adds spawn. Casters (Black Mage, Summoner) maintain positioning flexibility. Balance your composition between range flexibility and single-target damage output.
Role synergy trumps individual job optimization. A group where everyone understands their job’s strengths beats a group of individual optimization heroes who can’t coordinate cooldowns.
Detailed Strategies for Each Role
Tank Strategy and Positioning
Your job as tank isn’t just holding aggro, it’s creating space for mechanics to happen safely. Cloud of Darkness forces you into specific positioning patterns.
Maintain the boss center during opener while establishing threat. Once mechanics start, position the boss away from stack markers so DPS has clear sightlines. When spread mechanics hit, move to your designated zone and anchor your positioning there. Tanks often become impromptu raid leaders: the rest of your team watches your positioning to time their own movement.
Cooldown rotation for tankbusters:
- Meteor Strike (0:15): Use a basic defensive (Rampart/Sheltron/Dark Mind/Nebula)
- Second Meteor Strike (1:30): Chain a different cooldown
- Final burst phase Meteor Strikes: Stack multiple cooldowns and call for healing cooldowns
During add phases, cycle threat between adds while your off-tank or designated DPS burns them. Don’t let adds sit, the longer they live, the more the boss heals. Your positional awareness directly impacts add clear speed.
The enrage phase demands precise cooldown sequencing. You’ll eat multiple tankbusters back-to-back. Plan your cooldown order beforehand so you’re not scrambling mid-fight. Healer communication matters here: if a cooldown didn’t land properly, your healer needs to adjust immediately.
Healer Priorities and Cooldown Management
Healing Cloud of Darkness isn’t about spam-casting, it’s about timing cooldowns to maximum efficiency. Burst phases demand coordinated defensive cooldowns from your entire raid.
Priority healing targets:
- Tank during tankbusters (non-negotiable)
- Anyone taking spread mechanic damage (varies per mechanic)
- Raid during Void Implosion and Utter Darkness
Your major cooldowns (Divine Veil, Temperance, Recitation, Sacred Soil) need to align with predictable damage phases. Don’t waste them on random raid damage, save them for mechanics that chunk your group.
Mana management separates competent healers from great ones. This fight lasts 5-7 minutes depending on DPS. You need enough mana regeneration to sustain for the full duration. Piety stacking helps, but intelligent spell selection matters more. Use instant-cast heals (Tetragrammaton, Cure II procs) to maintain movement during mechanics instead of hard-casting into AOEs.
During phase three, coordinate with your co-healer. If you’re running with another healer, one should focus tank maintenance while the other manages raid health. Call out when you’re using major cooldowns so you don’t overlap unnecessary resources.
The Utter Darkness mechanic requires coordinated defensive cooldown stacking. Ideally, your tank, DPS, and healers all have shield or mitigation cooldowns ready. Each layer of mitigation reduces the hit: combined they make it survivable. Without coordination, you’ll eat enough damage to kill your weakest DPS.
DPS Rotations and Burst Windows
DPS is straightforward mechanically but demands discipline. Your job is maintaining uptime and hitting burst windows hard.
Phase one and two: Execute your standard rotation with priority on mechanics. Don’t tunnel so hard you miss spreads or stacks. The game punishes DPS who ignore mechanics, and lost uptime from an AOE hit costs way more than a slightly-delayed rotation.
Add phase: Rotate to adds immediately when they spawn. Typically, one ranged DPS and rotation from melee handles them quickly. Your co-DPS maintains boss damage. Never leave adds alive longer than 10 seconds, they heal the boss for significant amounts. If your group struggles here, your DPS check isn’t realistic.
Burst windows: When the boss becomes vulnerable (specific mechanics or low HP phases), every DPS uses offensive cooldowns. Pot, raid buffs, personal DPS cooldowns, everything goes now. These windows last roughly 15-20 seconds. Use them to their fullest.
Phase three push: Once the boss drops below 25% HP, your entire group should assume aggression mode. The enrage timer tightens significantly. Use offensive cooldowns more liberally. If the boss is going to enrage, you’re dying anyway, so spend everything to prevent it.
Throughout the fight, maintain positional awareness without sacrificing rotation execution. Modern FFXIV rotations are tight: missing GCDs costs noticeable damage. Stay mobile and keep pressing buttons even while moving. If you’re stationary for mechanics, use instant-cast abilities and save cast times for open phases.
Common Mistakes and How to Avoid Them
Every group makes mistakes learning this fight. Here’s what trips up most teams and how to fix it.
Ignoring add spawns: Players tunnel the boss and forget adds exist until they’ve healed the boss for 5% HP. Solution: Assign one player as “add caller.” They announce when adds spawn, and your DPS rotates to burn them immediately.
Overextending during spread mechanics: Players run too far from the group and lose healing range. Your healers can’t reach you, and you die to the next unavoidable raid damage. Solution: Spread to designated zones that are still within 30 yards of your healers. Test these positions during practice runs.
Healer cooldown overlapping: Both healers use their major cooldowns simultaneously, wasting stacking mitigation. Solution: Call cooldowns before they happen. “I’m using Sacred Soil on Void Implosion,” lets your co-healer know to save theirs.
Tank not cycling cooldowns: The tank pops one cooldown, loses it, and the next tankbuster finds them vulnerable. Solution: Pre-assign cooldown usage. Tank One uses Rampart, then Arm’s Length. Tank Two uses their cooldown rotation afterward. Write this down.
DPS losing uptime to panic: Mechanics happen, players panic and stop attacking. Lost GCDs during mechanics kill DPS checks. Solution: Learn the fight so you’re comfortable positioning during rotations. Practice using instant-cast abilities while moving.
Missing Utter Darkness cooldowns: The party doesn’t activate cooldowns for the ultimate attack and gets one-shot. Solution: Your shot caller (usually the main tank) says “cooldowns” when Utter Darkness starts casting. Everyone pops a defensive, including DPS.
Pushing too fast into phase transitions: Your group burns the boss before everyone’s positioned for the next phase. Mechanics overlap, things go chaotic. Solution: Don’t overgear the fight early in progression. Let the fight breathe. Once mechanics feel comfortable, then push DPS harder.
Not using raid resources effectively: Potions, food buffs, raid cooldowns sit unused. Solution: Pot on cooldown during high-damage phases. Food buff is permanent, use it before raid nights. Raid cooldowns (if applicable) go during peak damage windows, not random times.
Rewards and Loot You’ll Earn
Clearing Cloud of Darkness provides tangible rewards that drive progression, making it a fixture in raid rotation farming.
Weekly rewards include:
- Radiant coins (weekly loot currency for upgrading gear)
- High-tier crafting materials
- Tomestones for gear acquisition
- Unique weapons and armor tied to this boss
The loot table drops weapons, armor, and accessories specific to the raid tier. Your job determines what’s useful, but Cloud of Darkness drops are universally relevant. Even casual players benefit from the tomes and crafting materials.
Savage versions grant additional rewards and cosmetic drops (titles, minions, mounts) exclusive to that difficulty. These become prestige drops once you’re farming for optimization. Many players run savage versions weekly specifically for these exclusive items alongside the combat satisfaction.
Most guilds use standard loot council or free-for-all systems. Understand your raid group’s loot rules before attempting. Cloud of Darkness itself drops roughly one unique piece per three-player split, so expect to see your wanted item eventually with consistent farming.
Beyond direct loot, completing Cloud of Darkness unlocks achievements and title rewards. Speedrun records exist on community leaderboards: serious players chase those for bragging rights. Several community resources like Game8 track record times and optimal strategies if you’re competing for placement.
The prestige of clearing carries weight in the community. Depending on difficulty tier, a Cloud of Darkness clear represents skill progression that other players respect. Casual content doesn’t offer this social validation, making it worth the effort.
Conclusion
Cloud of Darkness represents a significant mechanical checkpoint in Final Fantasy XIV’s raid progression. This fight tests coordination, individual execution, and resource management simultaneously, none of which exist in isolation. Success requires preparation, communication, and willingness to learn from failed attempts.
Your approach should be methodical: learn phase structures, drill role-specific strategies, and establish communication protocols before raid night. Teams that walk in prepared clear faster than groups that wing it. Updates to Final Fantasy 14 Dawntrail and graphics improvements keep the raid experience fresh, but fundamental mechanics remain consistent.
Consistency matters more than perfection. You don’t need flawless execution, you need repeatable execution across multiple attempts. Once your group hits that sweet spot where mechanics feel expected rather than surprising, your clear times drop dramatically.
The community has optimized Cloud of Darkness thoroughly. Resources like Twinfinite offer additional guides if you want supplementary perspectives. Don’t shy away from watching clear videos or reading strat guides from experienced raiders. Borrowing knowledge accelerates your progression significantly.
Most importantly, the fight rewards preparation and teamwork. Solo players don’t clear raids: teams do. Invest in communication, cooldown coordination, and mutual understanding with your raid group. Cloud of Darkness becomes manageable, then farmable, then enjoyable once everyone operates from shared knowledge.

